
The fundamental difference between asphalt and concrete is just the beginning; true wet-weather mastery comes from decoding the micro-hazards that overlay any surface.
- Surface porosity is key: Porous asphalt drains water from the contact patch, while non-porous concrete and road paint encourage a film of water to form, drastically reducing the coefficient of friction.
- Contaminants and temperature are non-negotiable variables. A thin layer of diesel or cold-hardened sport tires can negate any inherent surface grip.
Recommendation: Shift from passively avoiding ‘slippery spots’ to actively analyzing surface material, texture, and temperature to build a predictive model of available traction on every ride.
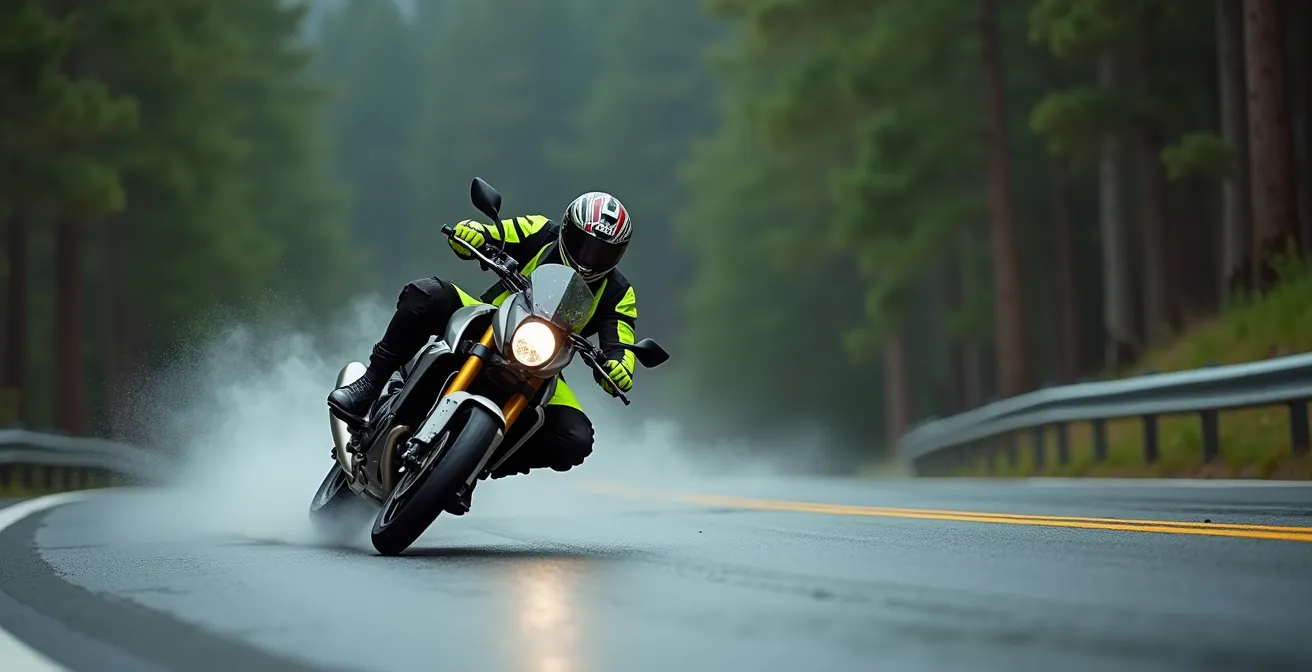
For any touring rider, the sudden darkening of the sky brings a familiar tension. The question isn’t just about getting wet; it’s about the radical transformation of the ground beneath. Most riders operate on a simple binary: asphalt good, concrete bad. This is a sound, if rudimentary, starting point. Asphalt, or more accurately, bituminous concrete, typically features a more porous, aggregate-rich surface that offers channels for water to escape the tire’s contact patch. Concrete, with its smoother, less porous finish, tends to hold a sheet of water more readily, increasing the risk of hydroplaning.
However, this macro-level understanding is dangerously incomplete. The experienced rider, much like a pavement engineer, knows that the real perils lie in the micro-variations and contaminants that litter our roadways. The fundamental material of the road is merely the canvas; the true story of available grip is told by the oil slicks, the glass-beaded paint, the hidden gravel, and the temperature of the pavement itself. Relying solely on the “asphalt vs. concrete” rule is like navigating a minefield with only a vague map.
This analysis moves beyond generic warnings. We will dissect the road surface from an engineering perspective, examining the specific physics and material science behind the most common and treacherous wet-weather hazards. The goal is to transform your perception from one of reactive fear to proactive analysis. By understanding *why* a surface behaves as it does, you can learn to read its language and accurately predict your available traction, corner by corner, mile after mile.
This guide deconstructs the most critical surface hazards a rider will encounter in the rain. Each section breaks down the specific engineering principles at play, providing the knowledge needed to anticipate and navigate these risks effectively.
Summary: Asphalt vs Concrete: How Surface Composition Changes Your Stopping Distance in the Rain?
- The Rainbow Warning: How to Spot Diesel Spills at Bus Stops Before You Lean?
- White Lines in the Wet: Why Road Paint Becomes Ice-Like When Rained On?
- Mid-Corner Gravel: How to Stand the Bike Up Safely Without Running Wide?
- Off-Camber Turns: Why You Need More Body Lean When the Road Slopes Away?
- Cold Tarmac Danger: Why High-Performance Tires Slide on 40°F Roads?
- Manhole Covers and Train Tracks: How to Cross Slippery Metal Safely in Rain?
- Why 2mm of Tread is Not Enough for heavy Rain Dispersion?
- Gravel in the Corner: How to React Without Chopping the Throttle?
The Rainbow Warning: How to Spot Diesel Spills at Bus Stops Before You Lean?
The iridescent rainbow sheen on a wet road is the most infamous sign of a diesel spill, a hazard that effectively lubricates the pavement. Diesel fuel has a lower density and surface tension than water, causing it to float and spread into a microscopically thin, persistent film. This film prevents the tire’s rubber from making contact with the road’s aggregate, reducing the coefficient of friction to almost zero. The most dangerous time is during the initial phase of a downpour, when accumulated oils and fuels are lifted to the surface before they can be washed away.
These spills are most prevalent in areas of heavy vehicle traffic, particularly where vehicles are stationary, accelerating, or decelerating. Bus stops, roundabouts, and the apexes of tight turns near industrial areas are high-risk zones. The challenge for a rider is to detect this invisible danger before committing to a lean angle. This requires a heightened state of observation, scanning the road far ahead for subtle changes in texture and reflectivity. A patch that appears ‘duller’ than the surrounding wet asphalt or where rainwater seems to bead up and skitter off unnaturally is a significant red flag, even without the tell-tale rainbow.
Action plan: 5 Essential Steps to Detect Diesel Contamination
- Scan Ahead: Actively look 100 feet ahead for any rainbow sheen or unnatural color variations, paying extreme attention at bus stops and intersections.
- Identify Dull Patches: Search for dark stains or patches that look different from the surrounding tarmac; these are often dried or absorbed diesel spots.
- Observe Raindrop Behavior: Watch how raindrops land. They will bead up and skate off a diesel patch instead of spreading out and soaking in as they would on clean pavement.
- Use Your Sense of Smell: When stopped at a light, be alert for the faint odor of unburnt fuel, which is a clear indicator of surface contamination.
- Recognize High-Risk Zones: Be preemptively cautious in known spill areas like bus stops, truck stops, gas stations, and roundabouts where heavy vehicles frequently stop and go.
By integrating these observational habits, a rider can identify potential diesel contamination long before the front tire loses traction, turning a potential accident into a managed hazard.
White Lines in the Wet: Why Road Paint Becomes Ice-Like When Rained On?
Road markings, such as white lines, crosswalks, and directional arrows, are notorious for their lack of grip in the wet. From an engineering standpoint, this is by design. Most modern road paint is a thermoplastic material containing tiny, embedded glass beads. The purpose of these beads is retroreflection: they bounce headlight beams back towards the driver, making the lines highly visible at night. However, this solution for visibility creates a severe problem for traction. The surface of these glass beads is perfectly smooth and non-porous.
This presents two problems for a motorcycle tire. First, the smooth, spherical surface offers no micro-texture for the tire’s rubber to grip. Second, the non-porous nature of the paint and beads prevents any water from draining away. A thin film of water becomes trapped between the tire and the marking, a phenomenon known as viscous hydroplaning. This effectively lubricates the surface, and the tire is no longer in contact with a solid, but is instead riding on a layer of water.

As the image above illustrates, the very mechanism that ensures nighttime visibility—smooth, reflective spheres—creates a frictionless plane when wet. The result is a surface with a coefficient of friction approaching that of wet ice. As Jon from Motorcycle News bluntly puts it:
Wet paint on any surface can offer next to no grip and you will be on your ear before you have time to react.
– Jon from MCN, Motorcycle News – How to brake in the wet
Therefore, riders must treat all painted surfaces in the rain as if they were ice, ensuring the bike is perfectly upright and making no inputs—no braking, accelerating, or turning—while crossing them.
Mid-Corner Gravel: How to Stand the Bike Up Safely Without Running Wide?
Encountering a patch of loose gravel mid-corner is one of the most unsettling experiences for a rider. The instinctual reaction is often to panic—chopping the throttle and grabbing the brakes. This is precisely the wrong response, as it abruptly transfers weight to the front tire, overloads its already compromised grip, and often leads to a low-side crash. The correct response is a calm, deliberate sequence of actions designed to minimize traction loss and maintain control.
The primary goal is to reduce lean angle as smoothly as possible to increase the size of the contact patch and cross the gravel with the bike as upright as possible. This is achieved with gentle, positive counter-steering pressure on the inside handlebar. It is crucial to fight the urge to fixate on the gravel. Your motorcycle will go where you look, so your gaze must be fixed on your desired escape path, well past the hazard. Simultaneously, maintaining a steady, neutral throttle prevents destabilizing drivetrain lash and keeps the suspension settled. Only once the bike is significantly more upright can you begin to apply gentle, progressive braking, using both front and rear brakes to slow the bike without locking a wheel.
Professional Rider Recovery Technique Analysis
This technique’s effectiveness is not just theoretical. Ken Condon, a respected riding instructor, demonstrated on a wet track how consciously relaxing body tension and reducing handlebar inputs immediately improves control over unexpected surface changes. By supporting his weight with his torso and legs rather than gripping the bars tightly, he allowed the tires to maintain their limited grip without competing with unnecessary steering forces, letting the bike find its own way across the hazard.
This methodical “Look-Straighten-Maintain-Brake” sequence allows the bike’s chassis and tires to manage the momentary loss of traction, transforming a potential crash into a controlled, survivable event.
Off-Camber Turns: Why You Need More Body Lean When the Road Slopes Away?
An off-camber turn, where the road slopes away from the direction of the turn, is a subtle but significant trap for the unwary rider. From a physics perspective, a normal, positively cambered corner helps you turn by tilting the ground towards the center of the corner, adding to the cornering force. An off-camber corner does the opposite. Gravity is now actively pulling your motorcycle *away* from the apex and towards the outside of the turn. This effectively reduces the amount of grip available for cornering.
To counteract this, the rider must generate more cornering force through other means. Since you cannot change the road, you must change your own mass distribution. The total lean angle of the motorcycle-and-rider system must be greater to negotiate the corner at the same speed. However, leaning the motorcycle itself further is risky, as you are already dealing with a reduced-grip scenario, and engineering data shows that maximum lean angles are reduced by up to 30% on wet surfaces. Leaning the bike further could easily exceed the tire’s available traction.
The solution is to lean your body *more* while keeping the bike *more upright*. By shifting your upper body far to the inside of the turn, you move the combined center of gravity of the rider/bike system inward. This achieves the necessary total lean angle required to make the corner, but does so without demanding an excessive, dangerous lean angle from the motorcycle’s tires. This technique maximizes the tire’s contact patch and keeps its forces aligned for grip, rather than for leaning.
Cold Tarmac Danger: Why High-Performance Tires Slide on 40°F Roads?
Modern motorcycle tires are marvels of chemical engineering, but their performance is intrinsically linked to temperature. The grip a tire generates is not just from friction, but also from a process called hysteresis, where the rubber deforms to envelop the road’s micro-texture, generating grip as it returns to its original shape. This process only works efficiently when the rubber compound is within its designed operating temperature range. Below this range, the tire’s chemical compounds undergo a “glass transition,” becoming hard and inflexible.
When a tire is “cold,” its ability to deform and conform to the road surface is severely diminished. Instead of a soft, pliable material that can key into the pavement’s irregularities, you have a hard, glassy surface that skitters across the top. This is particularly dangerous for riders using high-performance hypersport or track-oriented tires, which are designed with compounds that only “switch on” at very high temperatures. On a 40°F (4°C) day, these tires may never reach their minimum effective temperature, offering dangerously low levels of grip, especially in the wet.
The following table illustrates the critical differences in temperature ranges between tire types. It highlights why a touring rider’s tire choice is a crucial safety decision, not just a performance one.
| Tire Type | Optimal Temperature Range | Minimum Safe Operating Temp | Cold Weather Performance |
|---|---|---|---|
| Hypersport/Track Tires | 140-180°F (60-82°C) | 60°F (15°C) | Poor – becomes glass-like below 50°F |
| Sport-Touring Tires | 100-160°F (38-71°C) | 40°F (4°C) | Good – maintains flexibility in cold |
| All-Weather Touring | 80-140°F (27-60°C) | 32°F (0°C) | Excellent – designed for temperature variations |
A touring rider traversing different climates must be aware of this. A high-performance tire that feels sublime on a hot day in the south can become a liability on a cool, damp morning in the north. Choosing a sport-touring or all-weather tire with a wider operating range is a fundamental aspect of safe, all-conditions riding.
Manhole Covers and Train Tracks: How to Cross Slippery Metal Safely in Rain?
Metal surfaces like manhole covers, steel bridge expansion joints, and railroad tracks present an extreme traction challenge when wet. Unlike porous asphalt, steel is completely non-porous and has a very low coefficient of friction even when dry. When wet, this is amplified, creating a surface as slick as greased glass. Any attempt to brake, accelerate, or turn on these surfaces will almost certainly result in an immediate loss of traction.
The danger is compounded by the geometry of these obstacles. Railroad tracks, for instance, can “catch” a motorcycle’s front wheel if crossed at a shallow angle, guiding it along the rail and forcing a fall. An analysis of motorcycle incidents shows that crossing metal surfaces at angles less than 45 degrees increases crash risk by 300%. The technique for safely crossing these hazards is therefore rigid and non-negotiable, based on minimizing time on the surface and eliminating all destabilizing inputs.
The core principles are to keep the bike perfectly upright and to cross the obstacle as close to a 90-degree angle as possible. This minimizes the time the tires spend on the slippery surface and prevents the front wheel from being “channeled” by a track or edge. All speed and line adjustments must be completed *before* reaching the obstacle. Once on the metal, the throttle must be held steady and neutral, and the rider’s body should be loose, with weight slightly lifted off the seat by standing on the pegs. This allows the suspension to absorb the impact without upsetting the chassis. Your focus should not be on the obstacle itself, but on the clear path beyond it.
Why 2mm of Tread is Not Enough for heavy Rain Dispersion?
A tire’s tread is not for grip on dry pavement; its primary function is to disperse water from the contact patch to prevent hydroplaning. The grooves, or sipes, act as channels to pump water out from under the tire. The effectiveness of this water pump is a direct function of tread depth, vehicle speed, and water depth on the road. As tread depth decreases, the volume of the channels is reduced, and the tire’s ability to clear water diminishes significantly. At a certain point, the tire can no longer disperse water as fast as it encounters it. A wedge of water builds up in front of the tire, lifting it off the road surface completely. This is hydroplaning.
The relationship between speed and water dispersion is not linear; it’s exponential. As hydrodynamic research confirms that doubling speed requires tires to disperse four times the amount of water to maintain contact with the road. This is why a tire that feels perfectly safe at 30 mph can suddenly let go at 60 mph. A tire with only 2mm of tread depth has a severely compromised ability to handle this exponential demand. Testing confirms this danger; studies show that a tire with 2mm of tread that is safe at 30 mph in heavy rain will often begin to hydroplane at just 60 mph under identical conditions.
While 2mm might be the legal minimum in many regions, from an engineering perspective, it is insufficient for safe operation in heavy rain at highway speeds. The water dispersion capacity is simply too low to fight the formation of a hydrodynamic wedge. For a touring rider who cannot choose to avoid the rain, maintaining a healthy tread depth of 3mm or more is a critical safety margin, providing the necessary drainage capacity to keep the rubber on the road.
Key Takeaways
- Grip is a function of material science: Understand that porosity, texture, and temperature define available traction, not just the road’s base material.
- Water is the enemy of friction: Any non-porous surface—be it paint, metal, or diesel-coated asphalt—will hold a film of water, creating a near-zero grip situation.
- Control your inputs: In any low-traction scenario, the solution is smooth, deliberate action. Abrupt changes in throttle, braking, or steering will overwhelm the limited grip.
Gravel in the Corner: How to React Without Chopping the Throttle?
While the previous section on gravel discussed the technique for standing the bike up, this section focuses on a more subtle but equally critical aspect: throttle control. The instinct when a tire slips on gravel is to immediately and completely close the throttle. This action, known as “chopping the throttle,” is one of the most common and dangerous mistakes a rider can make. It induces abrupt engine braking, which sends a shockwave through the drivetrain and causes a rapid weight transfer to the front suspension.
This sudden forward weight transfer compresses the front forks and dramatically increases the load on the front tire at the precise moment its grip is already compromised by the loose surface. This overload is a primary cause of front-end washouts and low-side crashes. The correct response is counter-intuitive: maintain a steady, neutral throttle. This doesn’t mean accelerating; it means applying just enough throttle to keep the drivetrain loaded and the rear wheel turning smoothly, without introducing either acceleration or deceleration forces. This keeps the suspension settled and the weight balanced between both wheels.
By maintaining a neutral throttle and a relaxed grip on the handlebars, you allow the motorcycle to move and find its own stability. A small slide on gravel is not necessarily a precursor to a crash. The bike’s chassis is designed to be stable, and as one expert from the Advanced Cornering Techniques Guide notes, “By maintaining a neutral throttle and looking ahead, the bike will almost always regain traction once it’s past the loose patch.” Trusting the bike, keeping your inputs smooth, and looking where you want to go will see you through far more effectively than a panicked reaction ever could.
The ultimate lesson is that riding in the wet is a science, not a gamble. By shifting your mindset from a reactive rider to a proactive surface analyst, you empower yourself with the most crucial safety tool of all: predictive knowledge. Start applying this engineering mindset on your next ride; begin actively observing, classifying, and understanding the materials beneath you to build your own internal model of available grip.