In summary:
- You can diagnose brake pad wear without tools by learning to interpret your bike’s sensory feedback.
- Key indicators include a spongy or hard lever feel, specific squeaking noises, and changes in the brake fluid reservoir.
- Visual inspection is possible with a flashlight, aiming to see at least 2-3mm of pad material remaining.
- Understanding the difference between pad types (sintered vs. organic) helps predict wear and performance.
Every rider has been there: crouching in a poorly lit garage, trying to peer through the intricate spokes of a wheel, flashlight in mouth, wondering, “Are my brake pads done for?” The conventional wisdom says to look, but it’s often an awkward, inconclusive process. You want to be safe, but you don’t own a full set of workshop tools or have the time to pull the calipers off just for a quick check. This uncertainty can gnaw at your confidence on the road.
The usual advice circles around listening for squealing wear indicators or noticing a drop in the brake fluid reservoir. While these are valid clues, they are often late-stage warnings or can be misleading if taken in isolation. A low fluid level could mean worn pads, but it could also be a leak. A squeal could be a wear indicator, but it could also just be dust. Relying on a single sign is like trying to solve a puzzle with only one piece.
But what if the real key isn’t one single trick, but learning to read a whole system of signals your bike is sending you? The truth is, your braking system communicates its health constantly through lever feel, sounds, and performance. This guide shifts the focus from a simple, often difficult, visual check to a more holistic diagnostic approach. We’ll teach you how to become a DIY advocate for your own safety by interpreting this sensory feedback, turning you from a worried owner into a confident rider who understands their machine’s language.
This article breaks down the common questions and symptoms related to brake wear. By understanding the ‘why’ behind each sign, you’ll be equipped to make an informed judgment about your brakes’ condition, all without ever reaching for a wrench. Let’s decode what your brakes are trying to tell you.
Summary: How to Check Brake Pad Thickness Without Removing the Caliper?
- The Burnishing Process: Why New Brakes Feel Weak for the First 50 Miles?
- Why Do My Brakes Squeak Just Before I Stop?
- The Spongy Lever: How to Tell if It’s Old Fluid or Glazed Pads?
- Why One Pad Wears Out Faster Than the Other in the Same Caliper?
- Do Sintered Pads Eat Rotors Faster Than Organic Pads?
- Sintered vs Organic Pads: Which Bite Better When Cold?
- Why Stock Brake Fluid Boils After 5 Laps and How to Prevent It?
- ABS vs Non-ABS: How Much Shorter is Your Stopping Distance in the Rain?
The Burnishing Process: Why New Brakes Feel Weak for the First 50 Miles?
That slightly nerve-wracking feeling of weakness from a fresh set of brake pads is perfectly normal; it’s a critical phase known as the burnishing or “bedding-in” process. Your new pads aren’t yet perfectly mated to the surface of your brake rotors. The goal of burnishing is to create a smooth, even transfer layer of pad material onto the rotor disc. This microscopic layer is what creates the optimal friction for powerful, consistent braking. Without it, the contact is uneven and the stopping power is significantly reduced.
During this initial period, you are essentially heat-treating the components together. As you apply the brakes, friction generates immense heat, with braking temperatures easily reaching 300°C during hard stops. This heat helps cure the resins within the pad material and facilitates the transfer to the rotor. The first 50 miles are all about applying this heat gradually. Sudden, hard stops can create hot spots, leading to glazing (a hardened, slick surface) and permanently reduced performance. The key is a series of gentle-to-moderate heat cycles—braking, cooling, and repeating—to build that crucial transfer layer.
Think of it like seasoning a new cast-iron skillet. You don’t just throw it on high heat immediately. You apply oil and heat it gently to create a non-stick surface. Similarly, gentle initial use ensures your pads and rotors become a perfectly matched pair. Avoid aggressive braking and sudden stops for your first few rides to allow the pads to seat properly. This patience pays off with stronger, more predictable, and longer-lasting brakes for thousands of miles to come.
Why Do My Brakes Squeak Just Before I Stop?
That high-pitched squeal right as you come to a halt is one of the most common—and annoying—brake-related sounds. In most cases, it’s not a sign of catastrophic failure but rather the result of high-frequency vibration. Think of it like running a wet finger around the rim of a crystal glass. The brake pad, caliper, and rotor are all vibrating against each other at a frequency our ears perceive as a squeal. This is especially common at very low speeds because the pads are “grabbing and releasing” on the rotor surface hundreds of times per second, a phenomenon known as slip-stick friction.
Several factors can cause this vibration. It could be as simple as brake dust, dirt, or moisture trapped between the pad and rotor. Sometimes, atmospheric conditions like high humidity can make brakes more prone to squeaking. The composition of the brake pads themselves also plays a major role; harder, metallic pad compounds are often noisier than softer, organic ones because they create more aggressive vibrations.
However, a persistent and loud squeal should not be ignored, as it can be a deliberate warning. As the BrakesToGo Technical Team explains, many pads have a built-in wear indicator. This is a small metal tab designed to make noise once the pad material wears down to a certain level. In their words: “When the brake pad itself wears down to a dangerous extent, the indicator will scrape against the rotor.” This creates a very distinct, metallic scraping or squealing sound that tells you it’s definitively time for a replacement. The key is to distinguish between a light, intermittent squeak (often harmless) and a loud, consistent, metallic screech that signals your pads have reached their service limit.
The Spongy Lever: How to Tell if It’s Old Fluid or Glazed Pads?
A spongy or mushy brake lever is a serious red flag, as it indicates a loss of hydraulic pressure and braking force. The challenge for a rider is diagnosing the cause: is it the pads or the fluid? The answer lies in how the lever feels and behaves. A truly spongy lever that feels compressible, almost like squeezing a tennis ball, is almost always a sign of air in the brake lines. Brake fluid is incompressible, but air is not. When you pull the lever, you’re compressing the air bubble instead of moving the caliper piston, resulting in a weak, bouncy feel. This requires bleeding the brake system.
If the lever feels soft and the feeling gets progressively worse as the brakes heat up (for example, during a spirited ride down a mountain pass), the likely culprit is water-saturated brake fluid. Brake fluid is hygroscopic, meaning it absorbs moisture from the atmosphere over time. This water lowers the fluid’s boiling point. Under heavy braking, the heat can cause this water to turn to steam (which, like air, is compressible), leading to a mushy lever and brake fade. You can often spot this by inspecting the fluid in the master cylinder reservoir. New fluid is typically clear or light amber, while old, contaminated fluid will look dark, cloudy, or even like black coffee.
In contrast, if your lever feels firm and hard, but the bike simply doesn’t stop well, you may be dealing with glazed brake pads. This happens when the pads overheat, causing the resin in the pad material to crystallize and form a hard, slick surface. The lever feels solid because the hydraulic system is working correctly, but the pads can’t generate enough friction against the rotor. Diagnosing the problem starts with understanding the specific feel of the lever. This chart breaks down the common symptoms:
| Symptom | Lever Feel | Likely Cause | Solution |
|---|---|---|---|
| Springy Response | Compressible, bounces back | Air in brake lines | Bleed brake system |
| Mushy Feel | Soft, worsens with heat | Water-saturated fluid | Complete fluid flush |
| Firm but Weak | Hard lever, poor stopping | Glazed pads | Replace brake pads |
| Oscillating Feel | Pulsing through lever | Warped rotor | Replace or resurface rotor |
Why One Pad Wears Out Faster Than the Other in the Same Caliper?
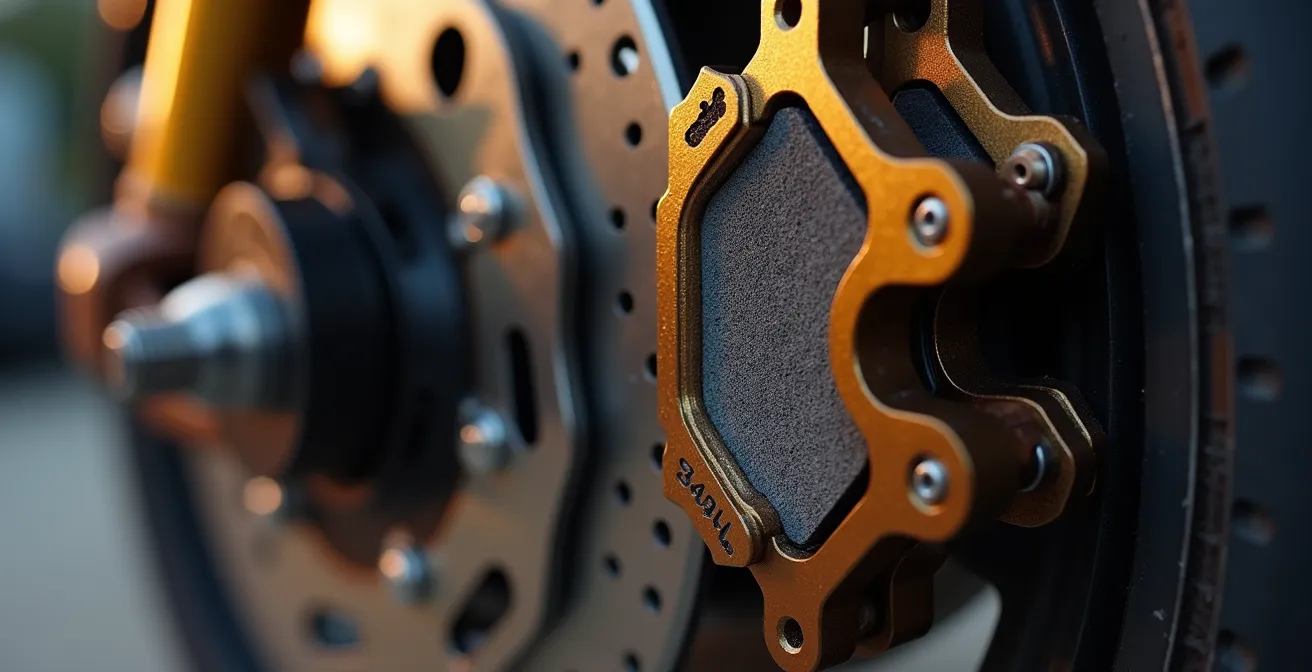
When you finally do inspect your pads, you might notice something odd: the inner pad is worn down to the metal, while the outer pad looks almost new. This uneven wear is a classic symptom of a mechanical issue within the caliper itself. In a perfectly functioning system, the caliper piston pushes the inner pad against the rotor, and simultaneously, the caliper body slides on guide pins to pull the outer pad against the other side with equal force. Both pads should wear at nearly the same rate.
When one pad wears significantly faster, it almost always points to a problem with the caliper’s sliding mechanism. The most common cause is that the caliper slide pins are stuck or binding due to corrosion, dirt, or old, hardened grease. When this happens, the caliper can’t slide freely. The piston pushes the inner pad against the rotor, but the outer pad doesn’t get pulled in with equal force. As a result, the inner pad does most of the braking work and wears out prematurely, while the outer pad barely makes contact. This not only destroys your pads but also dramatically reduces your overall braking performance.
This is a critical diagnostic clue that you can spot even without removing the caliper. If a visual inspection reveals one pad is visibly thinner than the other, it’s a sign that your braking system needs more than just new pads—it needs a service. A proper caliper service involves cleaning and re-lubricating the slide pins to restore smooth movement. As a rule of thumb, you should be looking for a minimum pad thickness on both pads. Most industry standards indicate you should replace pads once they reach 2 to 3 millimeters of minimum thickness, or about the thickness of two dimes stacked together. If one pad is at this limit and the other isn’t, you’ve found your problem.
Do Sintered Pads Eat Rotors Faster Than Organic Pads?
This is a long-standing debate in the motorcycle community, and the answer is nuanced: yes, sintered pads generally cause more rotor wear than organic pads, but it’s a deliberate trade-off for significantly higher performance. Organic pads are made from a mix of fibers and resins, making them softer. They are gentle on rotors and offer a nice, progressive initial bite, but they have a lower heat tolerance. In contrast, sintered pads are made by fusing metallic particles together under high heat and pressure, creating a much harder, more aggressive compound.
This hardness is what gives sintered pads their superior performance, especially under extreme conditions. While thermal analysis shows organic pads can begin to fail around 300°C, sintered pads can handle temperatures up to 1000°C. This makes them the clear choice for track riding, aggressive street riding, or heavy bikes where heat dissipation is critical. However, this aggressive metallic compound acts more abrasively on the cast-iron or stainless-steel rotor, leading to faster wear over time. You are trading rotor life for stopping power and fade resistance.
However, simply saying “sintered pads eat rotors” is an oversimplification. Proper management can mitigate this wear. The most important factor is ensuring your rotors are compatible with sintered pads, as some softer, older rotors are designed for organic pads only. Secondly, a proper bedding-in procedure is crucial to establish that transfer layer we discussed earlier, which helps protect the rotor surface. For any rider considering the switch, managing the trade-offs is key.
Action Plan: Managing Rotor Wear with Sintered Pads
- Check Compatibility: Before installation, confirm that your motorcycle’s rotors are rated for use with sintered pads. Check your owner’s manual or manufacturer’s website.
- Ensure Proper Bed-in: Follow a strict bedding-in procedure to establish an even transfer layer on the rotor, which protects it from excessive abrasion.
- Monitor Rotor Thickness: Use a micrometer to regularly check rotor thickness against the minimum spec stamped on the rotor carrier, especially when using aggressive pads.
- Match Pads to Conditions: Consider your primary riding environment. Wet, muddy, or high-performance conditions favor sintered pads, while casual dry-weather riding may be fine with organic pads.
- Evaluate True Cost: Don’t just look at the initial price. Consider the cost-per-mile, factoring in both pad and rotor longevity versus the performance gained.
Sintered vs Organic Pads: Which Bite Better When Cold?
When choosing between sintered and organic pads, one of the most practical considerations is how they perform right from the first stop on a cold morning. Here, organic pads have a clear advantage. Because of their softer compound made of materials like rubber, resins, and Kevlar fibers, they generate friction effectively even at low temperatures. This gives them an excellent initial “bite”—that immediate, confidence-inspiring grab you feel the moment you touch the lever. For city commuting and casual riding where stops are frequent and speeds are lower, this smooth, predictable cold performance is a major benefit.
Sintered pads, on the other hand, often feel less effective for the first few stops. Their metallic compound is designed to operate best at high temperatures. When cold, their coefficient of friction is lower, meaning they require a bit more lever pressure and don’t feel as sharp. They often need a short warm-up period—a few gentle applications of the brake—to reach their optimal operating temperature. Once they are warm, their performance becomes incredibly powerful and consistent, far surpassing organic pads in their ability to resist heat-induced fade.

This performance difference is a direct result of their material structure. An organic pad is like a composite material, while a sintered pad is a solid block of metal. The choice depends entirely on your riding style. If your rides are short, in-town trips, the immediate cold bite of organic pads might give you more confidence. However, if you’re a performance rider, a tourer carrying heavy loads, or someone who enjoys spirited canyon carving, the need for a brief warm-up with sintered pads is a small price to pay for their vastly superior performance and safety margin when things get hot.
Why Stock Brake Fluid Boils After 5 Laps and How to Prevent It?
On a racetrack, brakes are pushed to their absolute limits, generating extreme heat lap after lap. Stock brake fluid, typically DOT 4, is perfectly adequate for street riding, but it has a weakness: it’s hygroscopic, meaning it absorbs water from the air. Over time, this contamination drastically lowers its boiling point. On the street, the fluid rarely gets hot enough for this to be an issue. But after just a few hard-braking laps on a track, the heat transferred from the red-hot pads and calipers can easily push water-contaminated fluid past its boiling point. When fluid boils, it creates gas bubbles in the lines, leading to a sudden and complete loss of braking pressure—a terrifying phenomenon known as brake fade.
There’s another factor that accelerates this process: brake pad thickness. As your pads wear down, the caliper pistons have to extend further out to make contact with the rotor. This means more brake fluid moves from the cool master cylinder reservoir into the hot caliper. This larger volume of fluid in the caliper is more susceptible to heat-soak. Consequently, thinner pads lead to hotter fluid and a higher risk of boiling. For track use, you want as much pad material as possible to act as a heat shield for the fluid.
Preventing fluid boil requires a two-pronged attack. First, replace stock fluid with a high-performance, high-temperature racing brake fluid (like DOT 5.1 or a high-spec DOT 4) with a much higher “dry” and “wet” boiling point. This fluid should be flushed and replaced frequently, as even racing fluid will absorb moisture. Second, ensure you start any track day with thick, healthy brake pads, ideally brand new or close to it. This combination of fresh, high-temp fluid and thick pads creates a robust thermal barrier, keeping your lever firm and your braking power consistent, even under the most demanding conditions.
Key takeaways
- Brake pad health is a system issue: lever feel, sounds, and fluid condition are all connected to pad wear.
- A spongy lever points to air or water in the fluid, while a hard but ineffective lever suggests glazed pads.
- Uneven pad wear is a mechanical red flag, typically pointing to stuck caliper slide pins needing service.
- Pad material is a trade-off: organic offers better cold bite, while sintered provides superior high-heat performance at the cost of faster rotor wear.
ABS vs Non-ABS: How Much Shorter is Your Stopping Distance in the Rain?
While pad material and fluid condition are critical, the conversation about braking safety isn’t complete without considering the role of Anti-lock Braking Systems (ABS). In wet or unpredictable conditions, ABS is a true game-changer. It doesn’t inherently make your brakes “stronger,” but it makes them “smarter” by preventing the single biggest cause of crashes during emergency braking: wheel lock-up. When a wheel locks, it loses all traction, leading to an uncontrollable skid. ABS works by rapidly modulating brake pressure, keeping the wheel at the very edge of locking up, which is the point of maximum braking force.
In the rain, the difference is dramatic. On a wet surface, a non-ABS bike requires immense skill from the rider to apply maximum braking pressure without locking a wheel. Even for a professional rider, it’s nearly impossible to match the speed and precision of a computer. An ABS-equipped bike allows the rider to simply grab a handful of brake, and the system will deliver the shortest possible stopping distance without skidding. This can easily be the difference between a close call and a serious accident. The stopping distance can be up to 30% shorter with ABS in the wet compared to a non-expert rider on a non-ABS bike.
The effectiveness of the entire system, however, still relies on the quality of its components. Even the most advanced ABS can’t compensate for worn-out pads or boiled fluid. Scientific studies on brake pad formulation highlight this complex relationship. A study in *Scientific Reports* found that one pad formulation could achieve a high braking force of 640.99 N and a coefficient of friction of 0.3873, but it came with high noise and wear. Another formulation was quieter and longer-lasting but less powerful. This shows that the pad material defines the ultimate friction potential, while ABS optimizes how that friction is applied. Ultimately, ABS is a powerful safety net, but it’s not a substitute for maintaining the fundamental components of your braking system.
By regularly performing these visual and sensory checks, you empower yourself to take control of your motorcycle’s safety. You no longer have to guess about your brake health. Start today by listening to your bike—it’s telling you everything you need to know to ride with total confidence.
Frequently Asked Questions on How to Check Brake Pad Thickness Without Removing the Caliper?
Why does pad thickness affect brake fluid temperature?
As brake pads wear out, the caliper piston must travel further to apply the brakes. This requires more fluid to be pushed from the master cylinder into the caliper, which gets extremely hot during braking. This larger volume of fluid in the hot caliper is more susceptible to absorbing heat, raising its overall temperature and increasing the risk of the fluid boiling, which leads to brake fade. Thicker pads act as a better heat insulator for the fluid.
What’s the ideal pad thickness for track use?
While a new brake pad is about 12mm (1/2 inch) thick, most manufacturers and mechanics agree that pads should be replaced when they reach 3mm (1/8 inch), or about 75% worn. For track use, you should never start a session with pads that are close to this limit. It is highly recommended to use pads that are new or have a substantial amount of material remaining to ensure performance and heat management throughout the day.
How often should track riders check pad thickness?
Given the extreme wear rates on a track, riders should check their pad thickness before every single track day, if not between sessions. It is crucial to replace them well before the metal backing plate can contact the brake rotor, as this will cause immediate and severe damage to the rotor. For street riding, checking pad thickness at every tire rotation or at least once a year is a good safety practice.