Achieving a truly professional headlight upgrade is less about the parts you buy and more about mastering the fabrication process.
- Optical precision is non-negotiable, achieved through a meticulous 25-foot wall alignment test that accounts for rider weight.
- Component integrity relies on vibration-proof mounting and a perfect, moisture-free seal using high-quality butyl rubber, not silicone.
Recommendation: Treat your retrofit as a full fabrication project, focusing on alignment, sealing, and electrical stability to build a system that outperforms most OEM setups.
If you’re a dedicated night rider, you know the frustration. Your older bike’s stock halogen headlight paints a dim, yellowish smear on the road, and the so-called “plug-and-play” LED bulbs you tried were a disaster, scattering blinding light everywhere except where you needed it. They create glare for oncoming traffic while failing to illuminate the road ahead, a dangerous combination. This experience leaves many riders thinking a true lighting upgrade is out of reach.
The common advice is to simply buy brighter bulbs, but this ignores the fundamental physics of headlight design. A reflector housing is engineered around the precise focal point of a halogen filament. A drop-in LED, with its multiple diodes, can never replicate this single point of light, leading to uncontrolled scatter. The real solution isn’t a brighter bulb; it’s a better optical system. This is where the craft of projector retrofitting begins.
This guide moves beyond the basics. We won’t just tell you to swap parts. We will teach you the fabrication mindset required to achieve a flawless result. The key isn’t just installing a projector; it’s about mastering the meticulous process of alignment, sealing, and wiring that separates a hobby-grade attempt from a professional, razor-sharp cutoff beam. We’ll treat this as a lesson in optical precision, thermal integrity, and electrical stability—the three pillars of a build that is not only brilliant but also built to last.
By understanding and applying these professional-grade techniques, you will build a lighting system that provides a controlled, intense, and perfectly defined beam of light, transforming your nighttime riding experience from one of anxiety to one of absolute confidence.
Summary: A Fabricator’s Guide to Perfect Motorcycle Headlight Retrofits
- The 25-Foot Wall Test: How to Aim Your Projector Perfectly?
- HID vs LED Projectors: Which Offers Better Distance Throw for Highway Riding?
- Resealing Headlights: How to Prevent Moisture Condensation After Opening the Lens?
- High/Low Beam Function: How to Wire the Solenoid for Instant Switching?
- Demon Eyes and Shrouds: How to secure Internal Components Against Vibration?
- Yellow vs White Fog Lights: Which Cuts Through Mist and Rain Better?
- Deer Panic: Why They Freeze and How to Brake When You See Eyeshine?
- The “Invisible Rider” Mindset: How to Ride Like Nobody Can See You?
The 25-Foot Wall Test: How to Aim Your Projector Perfectly?
The single most important factor in a successful retrofit is achieving optical precision. All the lumens in the world are useless, and even dangerous, without strict beam discipline. The goal is a razor-sharp, flat cutoff line that puts maximum light on the road without blinding oncoming drivers. The industry-standard method for this is the 25-foot wall test. It’s not a suggestion; it’s a mandatory calibration procedure. This process ensures your new light is not just bright, but smart.
The difference between a DOT (Department of Transportation) and ECE (Economic Commission for Europe) beam pattern becomes clear during this test. The ECE pattern features a distinct “kick-up” on the right side to illuminate signs and the shoulder of the road, while the DOT pattern is generally flatter. Your projector will have one of these patterns, and aiming it correctly is paramount. The procedure requires precision and patience.

As you can see, the wall test reveals the true character of your beam. The goal is to set the height and horizontal alignment to perfection. In fact, many high-quality aftermarket projectors are so effective that they produce enough light to technically fail FMVSS108 testing by exceeding the maximum allowed lux. This underscores the responsibility you have to aim them correctly. An improperly aimed high-performance light is a menace.
Follow these steps rigorously:
- Position the motorcycle on a level surface, perpendicular to a flat, vertical wall.
- Move the bike as close to the wall as possible. Turn on the low beam and mark the horizontal center of the cutoff line with a strip of tape.
- Carefully back the motorcycle straight up so the headlight lens is exactly 25 feet from the wall.
- Measure the new height of your cutoff line. Adjust the projector’s aim until the cutoff is 2.1 inches below the original tape line. This creates the proper downward angle.
- Verify horizontal alignment, ensuring the hotspot of the beam is centered with your initial mark.
- Crucially, perform the final check with the rider (or equivalent weight) on the seat. This accounts for suspension sag, which can dramatically alter the final aim.
HID vs LED Projectors: Which Offers Better Distance Throw for Highway Riding?
Once you commit to a retrofit, the first major decision is the light source: High-Intensity Discharge (HID) or Light Emitting Diode (LED). The modern market pushes LEDs as the latest and greatest, but for a dedicated retrofitter, the choice is more nuanced. It’s not about which is “better,” but which is the right tool for the job. Your choice impacts light output, warm-up time, longevity, and thermal management.
HIDs function like an arc lamp, creating an intensely bright point of light by passing a high voltage current through xenon gas. LEDs create light by passing electricity through a semiconductor. This fundamental difference affects how they work inside a projector. A projector lens is designed to focus a tiny, single point of light into a controlled beam. HIDs naturally produce this single point, making them an ideal match for projector optics. LEDs, while instant-on and incredibly long-lasting, often use arrays of chips that can be harder to focus with the same precision.
This is reinforced by experts in the field. The technical team at XenonPro notes that while LEDs are excellent for filling out reflector housings, HIDs often have the edge in pure performance within a projector:
LEDs are more expensive. HIDs are cheaper than LEDs. As a general rule of thumb, LEDs are better in reflector-style headlights and HIDs are better in projector-style assemblies.
– XenonPro Technical Team, XenonPro LED vs HID Analysis
From a power perspective, LEDs have a clear advantage. While a typical HID system consumes 35-55 watts, LED headlights consume significantly less power, drawing only 20-30 watts. This reduced load on your bike’s charging system is a significant benefit. For a detailed breakdown, this comparison table highlights the key trade-offs:
| Feature | HID Projectors | LED Projectors |
|---|---|---|
| Total Light Output | Up to 8,000 lumens | Up to 10,000 lumens |
| Warm-up Time | 2-5 seconds | Instant on |
| Lifespan | 2,000-3,000 hours | Up to 50,000 hours |
| Best Application | Projector housings | Reflector housings |
| Heat Management | Runs cooler overall | Requires heat sinks/fans |
| Power Draw | 35-55 watts | 20-30 watts |
For highway riding where maximum distance throw is the priority, a high-quality HID projector often remains the top choice for its intense hotspot and ability to project light further down the road. However, for those prioritizing longevity and instant-on performance, a well-engineered LED projector is a formidable option.
Resealing Headlights: How to Prevent Moisture Condensation After Opening the Lens?
A beautifully aimed projector is worthless if the headlight housing fogs up with condensation after the first wash or rainstorm. Achieving perfect thermal integrity is a non-negotiable part of the craft. Opening a factory-sealed headlight is an invasive procedure, and your ability to reseal it to an OEM or better standard will determine the long-term success of your project. The enemy is moisture, and it will exploit any weakness in your seal.
The most common mistake beginners make is using silicone sealant. While it seems logical, silicone releases acetic acid as it cures, which can coat the inside of your lens and reflector with a hazy film. Furthermore, it cures into a hard, permanent bond, making future servicing a nightmare. The professional standard is a high-quality butyl rubber sealant, like Morimoto’s RetroRubber. Butyl remains pliable, is easy to work with, and creates a durable, waterproof seal that can be reopened if needed.
Case Study: The RetroRubber Sealant Standard
Morimoto’s RetroRubber has become the industry benchmark for resealing headlights after projector retrofits. Professional installers, such as those at Lightwerkz, report that the proper application of this butyl-based sealant is the key to creating a fully waterproof seal that remains pliable for future servicing. Unlike permanent silicone alternatives that make reopening the housing destructive, butyl allows for maintenance and upgrades. The success of the seal hinges on two factors: maintaining the proper application temperature to ensure good flow into the channel and using adequate clamping pressure during the 24-hour curing process to ensure a complete, gap-free bond.
The resealing process is a ritual that demands cleanliness and patience. Rushing this step will guarantee failure. Follow this professional process:
- Thoroughly clean the housing’s sealant channel, removing all of the old factory sealant.
- Clean the inside of the housing and the lens with isopropyl alcohol to remove all fingerprints, dust, and oils.
- Apply a new, continuous bead of high-quality butyl sealant into the clean channel. Gently stretch it to ensure it fits snugly without any breaks.
- Carefully press the lens back onto the housing, ensuring an even fit all the way around.
- Use several clamps to apply firm, even pressure to the assembly while the sealant cures for at least 24 hours.
- For an extra layer of defense, add one or two silica gel desiccant packs inside the housing (secured away from any moving parts) to absorb any trace amounts of moisture.
- For advanced builds, consider adding Gore-Tex breather patches over the housing vents. These allow pressure to equalize while blocking water molecules.
Your 5-Point Pre-Installation Audit
- Seal Channel Inspection: Visually inspect the entire perimeter where the lens meets the housing. Is the butyl sealant fully compressed and oozing slightly but evenly? Are there any visible gaps or thin spots?
- Internal Component Security: Gently shake the assembly. Do you hear or see any movement from the projector, shroud, or demon eye? Verify all mounting points are tight.
- Lens and Reflector Cleanliness: Hold the light up to a bright source. Are there any fingerprints, dust specks, or sealant smudges on the inside of the lens or on the chrome reflector?
- Electrical Function Test: Connect the assembly to a 12V power source. Test all functions: low beam, high-beam solenoid actuation (listen for a crisp ‘clack’), and any accent lighting. Check for flicker.
- Moisture Defense Check: Confirm that at least one fresh silica desiccant pack is secured inside, away from moving parts. If using a breather patch, ensure it’s properly adhered over a vent hole.
High/Low Beam Function: How to Wire the Solenoid for Instant Switching?
A bi-xenon or bi-LED projector gets its “bi” designation from a single, brilliant feature: an internal solenoid that moves a shield to create both the low and high beam from one light source. When de-energized, the shield is up, creating the sharp low-beam cutoff. When you hit your high-beam switch, it energizes the solenoid, which instantly snaps the shield down, unleashing the full beam. Ensuring this mechanism has clean power and operates with rock-solid reliability is a matter of electrical stability.
The solenoid is an electromagnet. When it receives a 12V signal, it pulls the shield out of the light path. This action needs to be instantaneous and dependable, thousands of times over the life of the headlight. Modern projectors use robust, side-action solenoids that are often up to 3x stronger than older, vertically-sprung units, providing a more positive and reliable “clack” on actuation. Wiring it correctly is not just about connecting two wires; it’s about protecting your bike’s sensitive electronics and ensuring flawless performance.
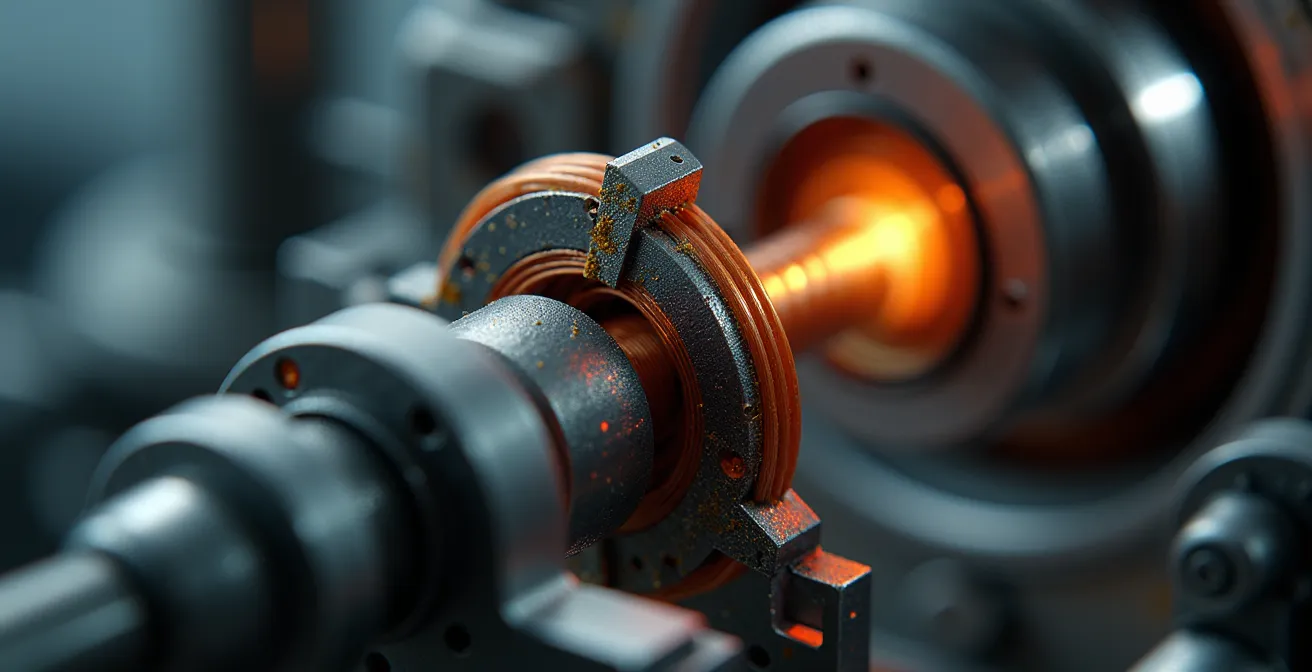
This macro view shows the heart of the high-beam function. The precision of this mechanical action depends entirely on the quality of the electrical signal it receives. Poor wiring can lead to solenoid “flutter,” incomplete actuation, or even voltage spikes that can damage your motorcycle’s ECU. To prevent this, follow professional wiring practices:
- Provide a stable voltage supply. A dedicated wiring harness that draws power directly from the battery is superior to tapping into the stock headlight wiring.
- Use appropriately sized wire, typically 14-gauge stranded copper wire, and protect it with tech-flex mesh sheathing for abrasion resistance.
- Ensure a solid ground connection to a clean, paint-free point on the motorcycle’s chassis. A bad ground is the source of countless electrical gremlins.
- Route all wiring away from hot engine components, sharp edges, and moving suspension parts to prevent damage.
- For maximum protection, consider installing a flyback diode across the solenoid’s two wires to absorb reverse voltage spikes when the solenoid de-energizes.
- If you experience “flutter,” adding a capacitor to the circuit can help smooth out the voltage and provide a cleaner signal.
Demon Eyes and Shrouds: How to secure Internal Components Against Vibration?
Once the core projector is mounted, the next stage of the craft involves aesthetics and finishing touches: the shroud and any accent lighting like “demon eyes” or “halos.” A shroud covers the projector’s body, giving the retrofit a clean, factory-finished look. Demon eyes are small, colored LEDs that illuminate the projector lens itself when the main headlight is off. While these parts define the style of your build, they also introduce a new challenge: vibration hardening. A motorcycle is a high-vibration environment, and any internal component that isn’t properly secured will eventually fail or fall off.
Shrouds are typically mounted to the projector body using small screws or a high-temperature epoxy like JB Weld. The key is to create a bond that can withstand constant engine buzz and road impacts. Using mechanical fasteners wherever possible is always preferable to relying on adhesives alone. For demon eyes and halos, their thin wires are especially vulnerable. They must be secured with dabs of epoxy and routed carefully to avoid being pinched or chafed by moving parts.
The projector itself is the heaviest component and requires the most robust mounting solution. Shaking and vibration can knock the rotational alignment off, ruining your perfect cutoff line. This is where purpose-built engineering makes a difference.
Case Study: Morimoto’s MotoHolder and Vibration-Proof Mounting
A prime example of vibration hardening in design is the Morimoto MotoHolder, an innovative three-piece mounting system. Older mounting methods used a simple clip that could loosen over time. The MotoHolder, engineered in California, uses a design that applies even pressure to the back of the bulb holder. This system is virtually no larger than the old clip setup but is significantly more effective at locking in the projector’s rotational alignment, maintaining a perfectly level cutoff line over thousands of miles of real-world riding. It’s a solution born from understanding that on a motorcycle, everything that can shake loose, will.
When securing your internal components, adopt a “belt and suspenders” approach. If you screw something down, add a drop of medium-strength thread-locker. If you glue something, make sure the surfaces are scrupulously clean and abraded for maximum adhesion. Every internal part must be treated as if it’s a critical component, because in a sealed headlight assembly, a loose shroud or demon eye can mean starting the entire, painstaking process all over again.
Yellow vs White Fog Lights: Which Cuts Through Mist and Rain Better?
The debate over yellow (or selective yellow) versus white light in poor weather is a classic one among riders. The common belief is that yellow light “cuts through” fog and rain more effectively. The science, however, reveals a more nuanced truth. It’s less about cutting through and more about reducing glare. This is a crucial distinction for a builder focused on real-world performance, not just folklore.
The core issue with driving in fog or heavy rain is the Tyndall effect: light from your own headlights scatters off the water droplets in the air, creating a wall of glare that reflects back into your eyes, severely reducing visibility. Shorter wavelengths of light (blue and violet, which are present in “cool white” light) scatter more easily than longer wavelengths (yellow and red). By using a selective yellow light, you are filtering out the blue wavelengths that are most prone to scattering. The result is not that you see “further” into the fog, but that you experience less reflective glare, which in turn reduces eye strain and improves your ability to discern shapes.
An analysis of lighting performance confirms this, stating that the actual color is only a small part of the equation:
Scientific Analysis of Yellow Light in Fog
Studies have shown that while yellow light doesn’t physically penetrate fog better than white light, it does significantly reduce the glare reflected back to the rider from suspended water droplets. This reduction in self-glare is what creates the perception of better visibility. However, the effectiveness of any fog light is approximately 90% determined by its beam pattern (a very wide, low-mounted beam with a sharp horizontal cutoff) and only about 10% by its color temperature. A poorly designed yellow light is still a poor light.
However, there’s a second, equally important benefit to yellow lights that has nothing to do with physics and everything to do with human psychology. In a sea of white and bluish headlights, a yellow light is unusual. This makes you more conspicuous to other drivers.
The conspicuity factor of yellow lights makes motorcycles stand out more to other drivers in low-visibility conditions simply because the color is unusual.
– Visibility Research Institute, Motorcycle Safety Lighting Study 2024
For a retrofitter, the takeaway is clear: for a dedicated fog light, a selective yellow color is advantageous for reducing glare and increasing conspicuity. But this choice is secondary to the most critical factor: mounting the light low and ensuring it has a wide beam with an extremely sharp cutoff to avoid illuminating the particles directly in front of your face.
Deer Panic: Why They Freeze and How to Brake When You See Eyeshine?
All the technical work of a retrofit—the aiming, sealing, and wiring—culminates in a single purpose: improving safety on the open road, especially at night. One of the greatest nighttime threats to a motorcyclist is a wildlife encounter. Deer, in particular, are notoriously unpredictable. Understanding their behavior in response to headlights is key to survival, and having superior lighting gives you a critical advantage in time and distance.
The “deer in the headlights” freeze is a real phenomenon. It’s not stupidity; it’s an overload of their sensory system. Their eyes are adapted for low light, and the sudden, overwhelming brightness of a modern headlight can cause temporary blindness and disorientation, leading them to freeze in place. The wide, bright beam of a well-aimed projector retrofit helps by illuminating the sides of the road far earlier than a stock headlight, giving you more time to spot the faint reflection of eyeshine above your cutoff line.
Spotting the eyeshine is your cue to act immediately. Your high-performance bi-xenon or bi-LED projector gives you the power of an instant high-beam flash, which can be enough to startle the animal out of its frozen state. But you must also be prepared to brake and evade. Having a pre-planned response protocol is crucial, as you will only have seconds to execute it.
When you detect an animal, execute this emergency response:
- Continuously scan the roadsides, looking for the tell-tale glint of eyes reflecting your light.
- As soon as you detect a presence, instantly flash your high-beam. The instantaneous response of a projector solenoid is a major advantage here.
- Simultaneously sound your horn. The combination of light and sound is most effective at breaking the freeze state.
- Begin to reduce speed progressively, applying both brakes smoothly. Avoid sudden, hard inputs that could lock a wheel and cause a loss of control. Maintain a straight line as much as possible.
- Aim for the animal’s tail. They are most likely to bolt forward, so aiming for where they *were* gives you the best chance of missing them.
- Be prepared for completely unpredictable movement. Where there is one deer, there are often more.
Key Takeaways
- A sharp cutoff isn’t optional; it’s the primary goal, achieved only through a meticulous 25-foot wall test that accounts for rider weight.
- The best light source (HID vs. LED) depends on the application; HIDs often excel in projectors for distance, while LEDs offer longevity and efficiency.
- A durable, moisture-free headlight relies on a perfect seal using high-quality butyl rubber and desiccant packs, never silicone.
The “Invisible Rider” Mindset: How to Ride Like Nobody Can See You?
We’ve spent this entire guide focused on the craft of producing superior light—how to project it with precision, how to make it reliable, and how to use it to navigate hazards. But the final, and most important, component of a high-performance lighting system is the rider’s brain. The ultimate benefit of a perfect retrofit isn’t just seeing; it’s the profound impact it has on your defensive riding strategy. It enables you to fully adopt the “Invisible Rider” mindset.
The “Invisible Rider” mindset is a defensive philosophy where you operate under the constant assumption that no other vehicle on the road can see you. You make lane choices, adjust speed, and approach intersections as if you are completely transparent to everyone else. This forces you to rely solely on your own perception and planning. Poor lighting is a major barrier to this mindset; if you can’t confidently see your own path, you ride nervously, hugging the centerline or the shoulder, unable to use your full lane for positioning and evasion.
A high-quality projector retrofit directly addresses this by dramatically improving your primary sense—vision. The intense, wide, and well-defined beam of light paints a clear, high-definition picture of the road ahead and its periphery. This has a powerful psychological effect.
Case Study: Cognitive Load Reduction Through Superior Illumination
Improved visibility from a projector retrofit offers superior brightness and clarity, which directly reduces the mental strain—or cognitive load—of riding at night. According to an analysis by lighting specialists, this enhanced visibility allows riders to process their environment more efficiently. Riders with quality retrofits report feeling more confident to use their full lane width to establish a safe path of travel, rather than being defensively funneled into one small area due to poor peripheral vision. By reducing the mental energy spent just trying to see, the rider frees up cognitive resources to focus on hazard identification, prediction, and defensive positioning.
By removing the anxiety of the unknown, your new lighting system empowers you to ride proactively, not reactively. You can focus on lane positioning, escape routes, and the behavior of other traffic because you are no longer dedicating the majority of your brainpower to simply deciphering the dim road ahead. This is the true pinnacle of a successful retrofit: it transforms a piece of hardware into a tool that elevates your skill and sharpens your survival instincts. You ride better because you see better.
Now that you understand the principles of a professional-grade retrofit, the next logical step is to begin planning your own build. Source your components, clear your workspace, and commit to the craft.