In summary:
- Effective cold-weather riding is about active microclimate management, not passive insulation.
- Your three-part layering system (base, mid, shell) must prioritize moisture wicking to stay dry, and therefore warm.
- Trapped air is your insulation. Bulky, compressed layers are ineffective; the goal is to create loft.
- Preparing your motorcycle (tires, lights) for the cold is as critical as gearing up your body.
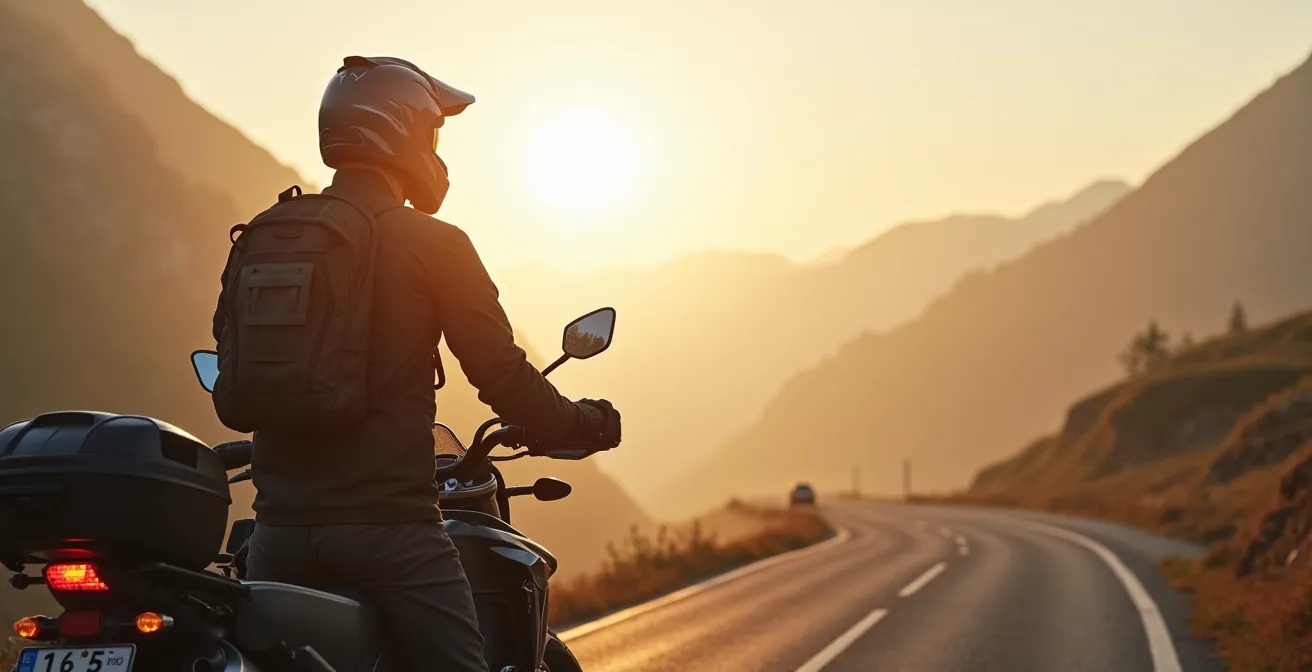
The bite of 40-degree air at 60 mph is a physical reality that sends most motorcycles into hibernation. The common wisdom is to either surrender to the cold, pile on bulky clothes until you can barely move, or wire yourself into the bike like a household appliance. Many riders believe that serious cold-weather comfort is only possible with an expensive, battery-draining heated suit. This approach, however, misses the fundamental principles of staying warm in harsh environments.
For decades, mountaineers and arctic explorers have faced far more extreme conditions without plugging into a power source. Their secret isn’t about enduring misery or wearing the thickest jacket; it’s about science. The key is a concept I call active microclimate management. It’s the art of controlling the thin layer of air and moisture right next to your skin. Getting this wrong means you’ll be cold and damp from your own sweat, no matter how expensive your outer jacket is. Getting it right means you can ride comfortably, extend your season, and adapt to changing conditions with nothing more than three purpose-built layers.
This guide abandons the “more is better” fallacy and applies the proven logic of an alpine layering system to motorcycling. We will deconstruct the function of each layer, address critical failure points like gear waterproofing and visor fog, and extend the system’s logic to your machine’s own winter vulnerabilities. By mastering this system, you gain freedom from the tyranny of the thermometer and the electrical tether.
For those who prefer a visual demonstration, the following video offers a practical look at layering principles. While the narration is in Spanish, the visual examples of selecting and putting on different layers are universally understood and reinforce the concepts we will cover.
text
To help you navigate this comprehensive system, we’ve broken down the essential components, from your personal gear to your bike’s performance in the cold. This is your roadmap to becoming a true year-round rider.
Summary: A Systematic Approach to Cold Weather Riding
- Waterproof vs. Water-Resistant: Why You Get Wet After 1 Hour in “Waterproof” Gear?
- Pinlock Visors: How Does a Double Pane Lens Stop Fogging Instantly?
- The Lobster Claw Dilemma: Mittens vs. Heated Gloves for Control Feel?
- One-Piece vs. Two-Piece Rain Suits: Which Is Easier to Put on Roadside?
- How to Dry Soaked Boots in a Hotel Room Without Melting Them?
- The Winter Penalty: Why Your EV Range Drops 30% Below Freezing?
- The Glass Transition: Why Soft Tires Can Crack in Freezing Storage?
- Halogen vs. LED: How to Upgrade Your Headlight Without Blinding Oncoming Traffic?
Waterproof vs. Water-Resistant: Why You Get Wet After 1 Hour in “Waterproof” Gear?
The term “waterproof” is one of the most misunderstood in motorcycle gear. You buy an expensive jacket, ride through a steady rain, and an hour later you feel that dreaded dampness. The failure isn’t always the gear; it’s often a misunderstanding of the physics at play. True waterproofing is a battle fought on two fronts: keeping liquid water out and letting water vapor (your sweat) escape. When your gear fails at the second task, you get wet from the inside out, a condition that rapidly accelerates heat loss.
Technical fabrics achieve this balance with a membrane (like Gore-Tex) and a face fabric treated with a Durable Water Repellent (DWR) finish. The DWR makes water bead up and roll off. When it fails, the face fabric “wets out,” becoming saturated. Though the membrane may still be blocking water, the saturated outer layer kills breathability. Your sweat vapor has nowhere to go, so it condenses on the inside. This is the vapor pressure differential failing. For serious riding, look for gear with a Hydrostatic Head (HH) rating; according to technical fabric testing, a minimum 20,000mm HH rating is what’s needed for reliable, all-weather motorcycle use.
The DWR is not permanent. Dirt, oil, and abrasion destroy it. Reviving it is the single most important maintenance task for your shell layer. Without a functioning DWR, even the most advanced waterproof-breathable gear will feel like a cheap plastic bag in the rain. Maintaining this outer defense is the first step to ensuring your entire layering system integrity.
Action Plan: 5-Step DWR Reactivation
- Wash the garment with a dedicated technical fabric cleaner to remove contaminants like dirt and oils that compromise the finish.
- Rinse the garment thoroughly, possibly twice, to ensure all detergent residue is completely removed.
- While the garment is still damp, place it in a tumble dryer on low to medium heat (around 140°F) for 20 minutes to reactivate the treatment.
- Test the surface by flicking a few drops of water on it. If they bead up and roll off, the DWR is restored. If not, repeat the heat cycle.
- For stubborn cases where heat won’t fully restore beading, you may need to iron the garment on a low, no-steam setting with a towel between the iron and the fabric.
Pinlock Visors: How Does a Double Pane Lens Stop Fogging Instantly?
Visor fog is more than an annoyance; it’s a critical safety failure. In cold or damp weather, the warm, moist air from your breath hits the cold surface of the visor and instantly condenses, blinding you. While anti-fog sprays and wipes offer temporary relief, the only truly effective solution is a Pinlock insert. It’s a perfect example of microclimate management, applied directly to your field of vision.
The principle is identical to a double-pane window in a house. The Pinlock is a second, smaller lens made of a moisture-absorbing material. It attaches to the inside of your main visor via two small pins. A silicone bead around the edge of the Pinlock creates a perfect airtight seal. This seal traps a small pocket of air between the insert and the main visor. This pocket of air acts as an insulator, preventing the inner surface (the Pinlock itself) from getting as cold as the outer visor. Your warm breath no longer hits a freezing surface, and fog simply cannot form.

The system is brilliantly effective, but its success hinges entirely on a perfect seal. In fact, motorcycle safety experts emphasize that most Pinlock ‘failures’ are actually installation errors. If the silicone bead isn’t perfectly flush against the visor, moist air will get into the air gap, and you’ll get fogging between the layers—the worst possible scenario. The tension of the lens must be adjusted using the eccentric pins until the seal is complete and uniform. A properly installed Pinlock isn’t just a comfort accessory; it’s a non-negotiable piece of all-weather safety equipment.
The Lobster Claw Dilemma: Mittens vs. Heated Gloves for Control Feel?
Cold hands are a rider’s worst enemy. They sap strength, reduce fine motor control for the clutch and brake, and make a ride miserable. The knee-jerk reaction is to grab the thickest gloves possible, but this often creates a new problem: a dangerous lack of tactile feel. This is the classic dilemma—warmth versus control. While heated gloves offer a powerful solution, a well-executed layering system for your hands, often paired with heated grips or handlebar muffs, can provide adaptable warmth without the bulk or reliance on wiring.
The “Lobster Claw” style mitten is a compromise, grouping fingers to share warmth while freeing the index finger for lever control. However, the most versatile approach is a system. This involves a thin moisture-wicking base layer glove (merino wool or silk) inside a windproof, moderately insulated main glove. This tiny layer of trapped air between the two gloves does wonders. For extreme conditions, a waterproof over-mitten can be deployed as an emergency shell. This modularity allows you to adapt to a wide range of temperatures by adding or removing layers, a flexibility that a single pair of bulky gloves or even heated gloves can’t match.
This system works best when supported by hardware. Heated grips, set to a low or medium temperature, provide a constant, energy-efficient source of core warmth to your palms, allowing you to wear thinner, more dextrous gloves. Handlebar muffs create a still-air pocket, drastically reducing convective heat loss from wind-chill. The goal is to create a complete hand-warmth ecosystem.
The right glove system depends entirely on the conditions. As this comparative analysis shows, there is no single solution, only the right tool for the job.
| Temperature Range | Glove System | Key Features |
|---|---|---|
| 50-60°F | Unlined leather | Maximum dexterity, minimal insulation |
| 40-50°F | Lightly insulated gloves | Balance of warmth and control |
| Below 40°F | Layering system | Liner + main glove + heated grips/muffs |
One-Piece vs. Two-Piece Rain Suits: Which Is Easier to Put on Roadside?
When the sky opens up, speed of deployment is everything. Fumbling with gear on the shoulder of a highway as you get progressively soaked is a frustrating and unsafe experience. The choice between a one-piece “track day” style rain suit and a separate jacket-and-pants two-piece combo isn’t just about storage space; it’s a strategic decision about practicality in an emergency. From a survivalist perspective, the gear you can get on fastest is the gear that will protect you best.
The one-piece suit offers a theoretical advantage: total protection with no gaps. There is zero chance of water getting driven up your back between the jacket and pants. However, they are notoriously difficult to put on quickly, especially over bulky riding gear and boots. It’s often a comical roadside dance that requires you to be almost fully exposed to the rain before you are protected by it. Storing a damp, muddy one-piece suit is also a clumsy affair.
The two-piece system is the clear winner for roadside deployment. A rain jacket can be pulled from a tail bag and thrown on in under 30 seconds at a stoplight, providing immediate protection for your core. This is a massive advantage, buying you time and keeping your upper body warm and dry while you find a safer place to stop and don the pants. The pants are the trickier part, but quality models with zippers running all the way to the hip allow you to put them on without removing your boots. This modularity also offers more versatility; on a day with intermittent showers, you might only need the jacket. For system integrity, a two-piece suit with a generous overlap between jacket and pants is the superior tactical choice for the touring or all-weather rider.
How to Dry Soaked Boots in a Hotel Room Without Melting Them?
Arriving at your destination with boots full of water is a tour-ending morale killer. Starting the next day by pulling on cold, clammy boots is even worse. The temptation to use a hotel hairdryer or place them on a radiator is immense, but this is the fastest way to destroy them. Direct, high heat will crack the leather, melt the glue holding the soles on, and permanently deform the waterproof membranes and armor. Drying boots is a game of patience and airflow, not intense heat.
The objective is to remove the bulk water and then facilitate evaporation. This requires a methodical approach, turning your hotel room into a makeshift drying chamber. Forcing air across and inside the boot is the single most effective technique. Most hotel rooms have a heating/air conditioning unit with a vent. This is your most powerful tool. It provides constant, moving air at a safe temperature. Placing your boots directly in the path of this airflow will cut drying time by more than half compared to letting them sit stagnant in a corner.
Follow a professional protocol to ensure your boots are dry and ready by morning without causing any damage. The process is a multi-step operation:
- Deconstruct: Immediately remove the insoles and any liners. These need to dry separately and will dramatically slow the process if left inside.
- Absorb: Use a hotel towel to press into and onto the boot, absorbing as much of the bulk surface water as possible. Spend five minutes on this; it’s time well spent.
- Wick: Stuff the boots tightly with crumpled newspaper. Leave it in for one hour only. The newspaper is brilliant at wicking out deep moisture, but if left in too long, it will just hold that moisture against the boot’s interior.
- Circulate: After removing the newspaper, position the boots and insoles directly under or in front of the A/C or fan vent for forced air circulation.
- Rotate: Change the position of the boots every couple of hours to ensure the air reaches all areas, inside and out.
If they are still slightly damp in the morning, do not despair. The “plastic bag trick”—placing a thin plastic grocery bag over your sock before putting your foot in the boot—will keep your foot perfectly dry for the day’s ride, giving the boot more time to air out at your next stop.
The Winter Penalty: Why Your EV Range Drops 30% Below Freezing?
The principles of cold weather survival extend to your machine, especially if it’s electric. Riders of electric motorcycles like the LiveWire or Zero often experience a disconcerting “winter penalty”—a significant drop in available range as temperatures fall. This isn’t a fault in the bike, but a fundamental reality of battery chemistry. Understanding this phenomenon is key to managing your energy reserves and not getting stranded.
A lithium-ion battery is a chemical power plant. Its performance depends on the speed of chemical reactions. Cold temperatures slow these reactions down. The electrolyte fluid inside the battery becomes more viscous, increasing internal resistance and making it harder for the lithium ions to move. This means the battery can’t discharge its energy as efficiently. The bike’s computer registers this as a drop in available capacity, and your range estimate plummets. Furthermore, a portion of the battery’s energy must be diverted to simply keeping itself warm enough to operate, a process that consumes precious miles before you even twist the throttle.
p>The impact is not trivial. While it varies by model and specific conditions, comprehensive real-world data from Recurrent shows an average of 78% range retention at 32°F (0°C), which can drop to just 70% at 20°F (-7°C) across tens of thousands of vehicles. This means a bike with a 100-mile optimal range might realistically deliver only 70-80 miles in freezing weather. This penalty is exacerbated by the energy needed for creature comforts like heated grips or seats. Planning winter rides on an EV requires a new, more conservative calculus, assuming you’ll lose about a quarter of your advertised range as a starting point.
The Glass Transition: Why Soft Tires Can Crack in Freezing Storage?
Your tires are your single most important piece of safety equipment, yet their performance is highly dependent on temperature. The soft, grippy compounds used in performance motorcycle tires have a specific operating temperature range. Below this range, rubber undergoes a change at the molecular level known as the “glass transition.” It’s the point where the material changes from a pliable, rubbery state to a hard, brittle, glass-like state. Riding on, or even moving, a motorcycle with tires below this temperature (Tg) can lead to cracking and a catastrophic loss of grip.
This is especially critical for riders who use aggressive sport or track-day tires on the street. These compounds are designed for maximum grip at high temperatures and can have a glass transition temperature that is surprisingly close to a cold winter’s day. Storing a bike in an unheated garage over winter and then rolling it out can be enough to cause micro-cracks in the tread blocks. On the road, a cold tire has drastically reduced traction. The rubber is too hard to conform to the road surface’s imperfections, making the contact patch smaller and less effective. It feels “wooden” and unresponsive.
This is why a proper tire warm-up procedure is not just for racers; it’s a critical safety protocol for any cold-weather ride. It’s not about getting the tires hot, but simply getting them out of the glass-like state and into their pliable, working range. This requires a period of gentle, deliberate riding to slowly introduce stress and heat into the carcass and tread.
- First 5 Minutes: Keep your speed under 30 mph. Use minimal lean angle and be gentle on the brakes and throttle. The goal is to simply flex the tire carcass.
- 5-10 Minutes: Gradually increase speed. On safe, straight sections of road, use gentle weaving to put more energy into the sides of the tires.
- 10-15 Minutes: The tires should start to feel more compliant. Monitor the feedback through the handlebars and chassis before resuming normal riding inputs.
- Visual Check: A very cold tire has a matte, dull finish. As it warms, you may see the surface take on a slight sheen.
- Emergency Indicator: If the tires still feel hard and unresponsive after 15 minutes of gentle riding, the ambient temperature is likely too low for that specific tire compound. Proceed with extreme caution.
Key Takeaways
- Your primary enemy is not cold, but moisture. A layering system that actively manages sweat is the foundation of warmth.
- The best gear is useless if maintained improperly. Reviving DWR and ensuring a perfect Pinlock seal are critical skills.
- True comfort comes from a system, not a single product. Combine layering with hardware like heated grips or handlebar muffs for ultimate adaptability.
Halogen vs. LED: How to Upgrade Your Headlight Without Blinding Oncoming Traffic?
Extending your riding season into the colder months inevitably means riding in lower light conditions. Shorter days and overcast skies make visibility—both seeing and being seen—a top priority. An LED headlight upgrade is a popular modification, promising a brighter, whiter light and lower power draw. However, a poorly executed upgrade can be worse than the stock halogen, creating dangerous glare for oncoming traffic and providing poor illumination where you actually need it.
The problem lies in the fundamentally different way Halogen and LED elements produce light. A halogen bulb has a glowing filament, a single point of light that the reflector housing is meticulously designed to capture and focus into a specific beam pattern with a sharp horizontal cut-off. This cut-off prevents light from shining into the eyes of other drivers. An LED “bulb,” by contrast, is usually a series of small, flat surface-mounted diodes. They are not a single point source. As the Motorcycle Safety Foundation warns:
Simply putting an LED bulb in a halogen reflector housing is what causes dangerous glare.
– Motorcycle Safety Foundation, LED Upgrade Safety Guidelines 2024
When you place this multi-point LED light source into a housing designed for a single-point halogen filament, the reflector can no longer control the beam. Light is scattered randomly, creating blinding glare for others and dark spots on the road for you. The only correct way to upgrade to LED is to replace the entire headlight assembly with a unit specifically engineered for an LED source, which uses precise projectors or a specially designed reflector to control the beam pattern. While a simple bulb swap is cheap, it’s a dangerous and irresponsible modification.
When choosing between a quality halogen and a proper LED assembly, the trade-offs are clear. LED offers superior lifespan and efficiency, but a good halogen bulb often provides better penetration in rain and fog.
| Feature | Halogen | LED |
|---|---|---|
| Power Draw | 55W typical | 20-30W typical |
| Color Temperature | 3000K (yellowish) | 5500-6000K (white) |
| Wet Weather Visibility | Good penetration | Better contrast/definition |
| Lifespan | 500-1000 hours | 30,000+ hours |
| Heat Generation | High (wasted energy) | Minimal |
Your journey to becoming a year-round rider begins not with a single purchase, but with a new mindset. Start by auditing your existing gear. Identify your base, mid, and shell layers, and evaluate them based on their true function—moisture management, insulation, and environmental protection. Building your perfect layering system is an incremental process of identifying and upgrading the weakest link.
Frequently Asked Questions on Cold Weather Motorcycle Gear
Can I put on rain pants without removing my boots?
Only with rain pants that feature extra-long leg zippers, ideally extending to the hip. Standard rain pants without this feature will almost always require you to remove your boots for entry.
How quickly can a two-piece rain jacket be deployed?
For sudden showers, a rain jacket can be pulled from its storage bag and put on in under 30 seconds, even at a stoplight. This provides immediate protection for your core while you find a safe place to pull over and don the pants.
What’s the best storage location for quick access to rain gear?
The top of a pannier, the outermost pocket of a tail bag, or a dedicated fender bag. It should never be buried at the bottom of your luggage where it is inaccessible during a sudden downpour.